SureFit Guarantee

We offer free replacements for measuring mistakes. If you make a mistake, we’ll send you a replacement at the right size.
How-to hang a picture frame
Hanging a picture frame is very easy when done the right way, but can go spectacularly wrong when the simple rules are ignored! For the purpose of this blog post we’ll focus our attention on hanging a standard picture frame using the traditional cord-and-D-rings technique. The best surface for this is always a flat surface – to keep the frame from slipping around, it’s always best to put a soft towel or similar down first.
Part 1
First things first – the picture framing supplies you’ll need
Number 1: a soft-lead pencil.
Number 2, the all-important cord: it’s a fact that you can hang a picture with any old piece of string. But it’s also a fact that using any old piece of string is nowhere near as good as using specially made picture hanging cord. This stuff is woven together using extra-tough, load-bearing fibres that won’t stretch of warp like string will. It also ties easily, allows the picture to hang evenly and doesn’t fray when you cut it (make sure those scissors are sharp!).
Number 3: D-rings. These come in 2 sizes – small or light-weight pictures should be fine with single-screw D-rings, whereas if you’re hanging something larger or more substantial, you’ll need the 2-screw variety. Unsure what your picture needs? Always best to go for the sturdier 2-screw version.
Number 4: screws. Small cross-head versions are best, and they shouldn’t go too deep into the frame or be so wide that they risk splitting the wood as you tighten them up.
Number 5: a screwdriver (generally speaking, using a multi-tool is fine, although we’ll get to that in a minute).
Number 6: a strong nail for the wall and a hammer to bang it in with (as many people are aware, there are numerous different fixtures for hanging pictures with, depending on the type of wall – for example plaster-board – but for this post we’ll cover the basics only).
Part 2
Fixing the D-rings and preparing the picture
Ask 5 different picture framers how to hang a picture frame and you’ll get 5 different answers (sometimes 7 or 8 – there are a few techniques you can use!). The thing with hanging pictures is that you have to find the way that works for you. Here’s a simple method which always works for me.
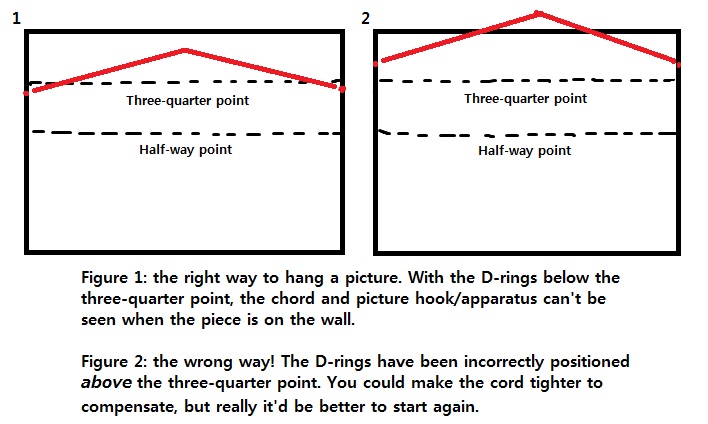
Step 1: ensure the acrylic or glass has been removed from the frame. Now, with your pencil, make a mark three-quarters of the way up each vertical side of the frame. The screw for each D-ring ideally wants to go about an inch or so below this point. Before you go any further…check that the 2 marks either side are on the same level! It’s surprisingly easy to get this wrong.
Step 2: is the frame very narrow? Then you’ll need to make sure that the screws are precisely in the middle of the wood, not too close to either edge!
Step 3: time to screw-in the D-rings. If you’re not used to doing this, or the wood is quite hard, you’re best off using a manual screwdriver (if you’re using a power-tool, don’t be too trigger-happy!). First, press the screw into the hole and push until the tip bites into the surface. Now, start to turn the screwdriver clock-wise, putting enough pressure on the screw to ensure it keeps turning into the wood.
Step 4: Now your D-rings are secured in position, take the cord – ideally a long piece – and thread it through one D-ring, then the other. Tie a simple knot in the middle. The cord shouldn’t be so tight that it pings like a guitar string, but it also shouldn’t be loose enough that there is no tension. Hold the frame upright and hang it on your finger, as if it was on the wall. If your finger is above the frame or very close to the top of it, the cord is too loose.
Step 5: tie another knot, then shift the cord along so that the knots aren’t in the middle (you want a clean piece of cord for it to hang on). Leave several inches of loose cord on either side, and cut it here (if you want it to be extra-neat, you can use masking tape to fix it to the main body of the cord).
Step 6: now you’re ready to hang it on the wall. Assuming you’ve checked you’re not going to be putting that nail through any pipes – we can tell you, it happens! – bang your nail in and hang your picture. Shift the picture sideways until it hangs nice and level. There – job done.
Looking to measure-up your art for mount board? In that case, click here.
